Building U-Net architecture for biomedical image segmentation.
The U-Net architecture is built using the Fully Convolutional Network and designed in a way that it gives better segmentation results in medical imaging. It was first designed by Olaf Ronneberger, Philipp Fischer, and Thomas Brox in 2015 to process biomedical images [https://arxiv.org/pdf/1505.04597.pdf]. Convolutional neural networks are generally used for image classification problems, but in biomedical cases, we have to localize the area of abnormality as well.

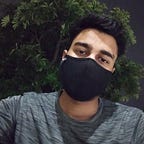
It has a “U” shape. U-Net architecture is symmetric and it’s functioning is somewhat similar to auto-encoders. It can be narrowed down into three major parts — The contracting(downsampling) path, Bottleneck, and expanding(upsampling) path. In auto-encoders, the encoder part of the neural network compresses the input into a latent space representation and then a decoder constructs the output from the compressed or encoded representation. But there is a slight difference, unlike regular encoder-decoder structures, the two parts are not decoupled. Skip connections are used to transfer fine-grained information from the low-level layers of the analysis path to the high-level layers of the synthesis path as this information is needed to generate reconstructions that have accurate fine-grained details.
Contracting Path
Contracting path is composed of four blocks where each block is made of :
- 3x3 Convolution Layer + Activation function (relu) [Dropout is optional]
- 3x3 Convolution Layer + Activation function (relu) [Dropout is optional]
- 2x2 Max Pooling Layer

Each block has two convolutional layers and one max-pooling layer. The number of channels is then switched to 64. Also, the kernel size of (3,3) is used which changes the dimensions from 572x572 → 570x570→568x568. The MaxPool2D layer then reduces the dimension to 284x284 and the process is repeated three more times until we have reached the bottleneck part.
Expanding Path
The expanding path is also composed of 4 blocks. Each of these blocks is composed of :
- DeConvolution or UpSampling2D layer with stride 2
- Image is concatenated with the corresponding image from the contracting path
- 3x3 Convolution layer + Activation function [Dropout is optional]
- 3x3 Convolution layer + Activation function [Dropout is optional]

The image is concatenated with the corresponding image and generates an image of dimension 56x56x1024. This process is followed by a set of Convolutional layers and the last Conv2D layer has one filter of size 1x1.
Building U-Net with Tensorflow and Keras
The first step in the process is to download a dataset. In this example, we’ll be using Kaggle’s 2018 Data Science Bowl which is a dataset with 128x128 images of nuclei and it’s mask. It can be used for biomedical image segmentation. If you’re using Kaggle API, you can download it with :
!kaggle competitions download -c data-science-bowl-2018Import the required packages and tools.
The next step is to create a data generator function that loads the data, resizes the images to a scale of 128x128, and normalizes them. Our aim is to create a data generator that returns the image and its mask. The structure of the Data Generator may vary as it depends on your requirement. After this, we’ll have to set some hyperparameters like image size, epochs, and batch size.
Now we can implement U-Net’s architecture i.e. contracting path, bottleneck, and expanding path.
U-Net model and training
We’ll repeat the down_block and up_block process four times, which is then followed by the last Convolutional layer which gives the final predicted mask. “Adam” optimizer is a good choice for an optimizer in this case and “binary_crossentropy” can be used as our loss function. Check it’s summary after a successful compilation of the model.
The next step is to train the model over a decent number of epochs and make predictions.
Now we can compare the real images with their predicted masks. Use matplotlib to plot these images and change the cmap, so that we can see the difference clearly.

This example was only focused on building the U-Net model. If you want the full code for this segmentation task, you can find it on my GitHub repository.
Advantages
U-Net performs much better compared to FCN-8. U-net is symmetric and the skip connections between the contracting and expanding path combines the location information from the downsampling path with the contextual information in the upsampling. Also, it doesn’t have any Dense layer, which means different image sizes can be used as input since the only parameters to learn on convolution layers are the kernel. The U-Net model can be used on different sets of images and results are quite satisfactory. Data augmentation techniques like shift and rotation invariance can be very helpful to teach the network the desired invariance and robustness properties when we have only a few training samples.

Intel is using its own version of U-Net for identifying tumors in both 2D and 3D models. Intel’s U-Net is trained on BraTS (Brain Tumor Segmentation) which is a subset of the Medical Segmentation Decathlon dataset. You can check their repository here.